Before starting with the shading, let’s make some order in the layers windows!
How to use the layer set
1- Select the highest level and then click below where there’s the icon of a folder.
2- Change the name of the folder that appears in the layer window, renaming it, for example, as “base”.
3-/4- starting from above to bottom, drag all the colour levels onto “base” (take care to maintain the original order).
5- Click where you see the small circle. The arrow will change direction from pointing down to pointing right and all the previous created layers are hidden in the folder! Left over are the layers with line art and the one with the background. Each time you need to select a layer inside the base set, just click again over the arrow. It’s like the tree visualization used for files.
Premise: the outlines
1) Now… the shadows!
This part of the tutorial will be quite difficult… be ready!
Little tutorial inside the tutorial!
VECTORS – IF YOU ALREADY KNOW THE OUTLINES (PHOTOSHP’S PEN TOOL) GO FORWARD!
To recreate the same shadows which are typical of the cells I use two method, similar to those described in point 2, where we have coloured Ruri’s skin together . Method 1 consists of making all the work free hand and correcting it with the eraser, as you can see in this screenshot of a Minako’s fanart of mine:
It’s long and laborious, but at that time I chose this method because I didn’t know well the “vectors” in Photoshop. Anyway, the most precise an easy (if you know it well) method is the vector. Why not the lasso? The polygonal lasso tool creates geometric selections, STRAIGHT segments. The vector allows you to create precise curves, called Bezier curves. Indeed, if you notice, the shadows follow the wisps of the hair (or the curve of the dress, or the shape of the body), so the lasso can’t help us, but the outline can, or the pen tool, as you may call it. I say it plain and straight: I don’t know how to use outlines well, but what I know helped me much to colour Ruri.
Lets’ start with a test:
download this image onto your PC and open it with Photoshop. Add a new layer above the image and select the Pen tool.
Follow the instructions:
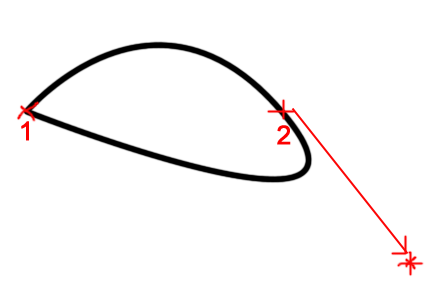
1- move the mouse over point 1 and click once over the centre of the X
2- move over point 2
3- as before, click over the centre of the X and then, keeping the mouse button pressed, move the mouse following the red arrow and release the mouse button when you’ll reach the center of the red asterisk *
See? You just did a part of the black outline! Now close the outline, returning to point 1 and click over the X.
As for the lasso, the pointer will become the symbol of the tool you are using, in this case the pen with a little circle. This means you are about to close the outline.
Now , if you outline the outlines with the brush (select the brush tool and then -> Layer windows, “outlines” folder -> “outline outlines with the brush” circle below) you’ll see you have done the same work I did. And so you learned how to make a curve and close the outline. But if I want to do something like this?
That is, straighten the curve which close the outline? To change the curve, we can use the “Convert point tool”.
Now, download this second image and open it in Photoshop.
Add a layer over the image and select the pen instrument. Follow the instructions:
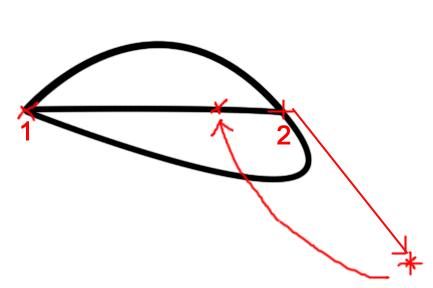
1-move the mouse over point 1 and click once over the X
2- move over point 2
3- as before click over the X and then, keeping the mouse button pressed, move the mouse following the red arrow and release the button when you arrive over the center of the red asterisk.*
4- Now close the outline, return to point 1 and clicking over the X. Select the “convert point” tool and click over point 2.
The outline and a small square over the asterisk will appear. Using “convert point”, click on the point over the astersisk and, keeping pressed the button, move the mouse following the second arrow until you reach the little cross. Release and the curve is straightened. But what have you moved? When you click over a point and drag you create a point with 2 anchors:
Let’s try to follow again the instructions for the first image until step 3, select the “convert point” tool ad play with the anchor 1 to see what happens. Then try to close the outline and follow the instructions given for the second image, moving anchor 2 not only where I said before, but also in other points. Train yourself a lot! Create curves with more points and discover all the tools and their uses.
To learn more about vectors:
www.elated.com/articles/paths-and-the-pen-tool/ <-in english
when you feel confident with the pen tool, continue reading!
Hair's shadow
Let’s come back to the shadow!
1) For the shadows, I started with hair. I picked with the eyedropper a sample of the colour from the hair and I chose a darker one:
Next, using the darker colour I made the stain indicated by the arrow in the first image of this page. It’s useful to make some stains of the colours you are using on a blank part of the sheet, in order to retrieve them easily with the eyedropper.
2) Create a new layer and call it “Shadow1” or “Shadow2” and set it on “multiply”:
3) Now use the outlines with the “pen” tool: select the “pen” tool, keeping the original file next to ours and try to recreate the curve I highlighted in red.
I have also highlighted two important points with the X. Click at the beginnig of the inferior curve, come up and click the second point.
KEEPING THE MOUSE BUTTON PRESSED follow the arrow (like in the image below) and then close the outline coming back to the starting point (the point of the tools with the little circle always indicates where the outline started and where we must close it).
Now we must refine the curve using the “convert point” tool.
Position the pointer over the anchor of the second point indicated below with a little circle and move following the arrows, until you get the shadow outline you want.
From the layer windows -> “outlines/paths” folder -> and click over “fill path” (the symbol circled in red)
Now, cancel the outline (drag it into the trash of the “outline” windows) and, if needed, correct with the eraser.
For the other parts, we can colour free hand without the need of vector outline:
Continue…
Shade of shadows
4) At this point, I decided I didn’t like the shade I was using for the shadows on the hair, so I modified the colour. There are various ways to do it, but here are the ones I use more often: Image then Adjustment, next Curves (keep in mind to stay on the level where you want to change the colour!)
Otherwise, use Image -> Adjustment -> Hue/Saturation and move the pointers as I did.
You could even the level opacity to soften the shade of a colour:
I had to recover the colour for the hair shadow made manipulating things above, so I made invisible the layers with the basic colours and picked this new shade with the eyedropper, making a new stain for reference.
I came back then to work with the outlines, and I remind you that it’s better to make many points for the more complex curves, as I did! (green points)
As you can see in fig. 2, I made a mistake with the angle of the curve, then I corrected with “convert point” using the anchors of that point. I remind you: every time you close an outline and fill it with colour, it is better to erase the outline! After an hour (I’m slow!) I ended the shading of the hair!
Yuppi ye!
Spheres and dress
5) Spheres!
Those little spheres need two layers of shadows to replicate the work of Gotoh! With the same colour of the shadow of the hair and on the same level I made a circle:
Next I added a new level, “Shadows2”, set on “multiply”
Next I picked the shade of shadow from Ruri’s dress and then I cose a lighter shade (Look at point 1, “”Shadows”):
Obviously, I made a lots of stains in a blank part of the sheet with the new colour. :P Then, on the level "Shadows2” I made another circle with the new colour redoing the darkest part of the sphere. Then I erased with a solid round eraser in the points visible in the image I’m copying, first on the level “Shadow2” and “Shadow1”, next in the basic colour one:
In the end I have the finished spheres, and a new stain of colour which I’ll use to make the shadows of the dress in the “Shadows2” layer ^^
6) Dress. There’s little to explain, remember what you learned until now, muster your patience and your outlines (“pen” tool) and make the shadows for the dress.
7) Ruri’s Hair have shadows more dark than others, so… open a new layer (which I called “shadow3”, set on “multiply”), choose the colour with the eyedropper and then find the right shade. I’ll not put images because now you should know the process! Then start to outline and fill with the new colour.
In the end:
With the same shade of colour I also did the shadows on the back pack:
Using some vector:
We arrive here
Shadow of the skin, shadow of the eyes
8) Skin/eyes shadows
I add a new level, called “Shadow4skin”, set on “multiply”, and then choose a light shade of grey starting from the range of the violet (the violet as a color for the shadows and the reflections sometimes gives a nice 3D effect, useless in this case but I wanted to start with all the same)
As always, I fill the places of the shadows with brush strokes and outlines.
Until I obtain:
Ruri’s skin also needs a double layer of shadows to outline the darkest, so repeat as before, adding a new level called “Shadows5skin2” set on multiply and, in this case, I chose with the eyedropper the shade of pink resulting from the union of the base colour with the first shade of shadows.
Finding it to be too dark, I set the opacity of this level to 90%
With the same shade of colour (and on the same level even if should be better doing it in a new level) I decidet to do also the shade on the eyes (pupils)
And in the end, using the pen tool, I also did the shadow on the eyes (a little is a very nice touch), util obtain:
We have almost finished ^^
Final touch!
Chin up!
Add a new level, set to “normal”, use red as colour and make the signs you see:
End!!!!!!!!!!!!
Erase the stains of colout and add a level with your sign and eventuallly with copyrights or your email address or the address of your site. Even if the image below doesn’t show it, join all the layers in a single layer using Image menu -> image size, save in jpg forma and… YOU HAVE FINISHED!!!!!
Here you find the finished drawing :3
For every problem contact us commentino or by writing to
elenadncavaliere@libero.it
source by nanda.com
[+/-] Selengkapnya...
[+/-] Ringkasan...


